Capturing the flash spectrum during a solar eclipse, with not professional equipment, is as challenging as it is rewarding. To help you get the best results, we’ve compiled a guide based on our experience so far, outlining everything from essential hardware to meticulous planning and execution.
Hardware Essentials:
To get started, you’ll need the following equipment:
– Camera: A DSLR or mirrorless camera with good video recording capabilities or a CCD camera for astrophotography.
– Lens: A suitable zoom lens.
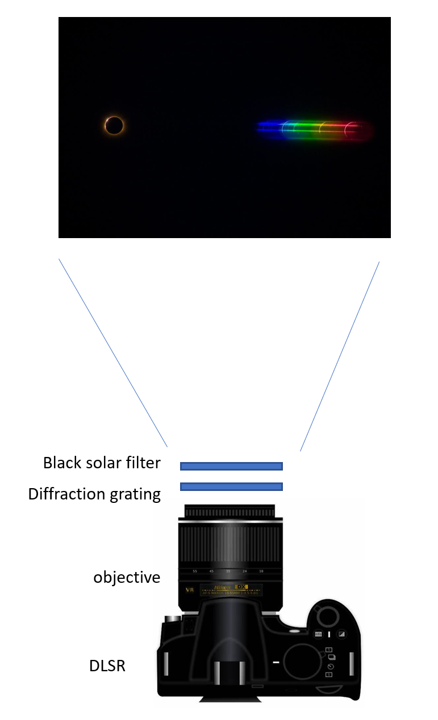
– Diffraction Grating.
– Solar Filter: Crucial for observing partial phases of the eclipse and protecting your gear.
– Star Tracker (Optional but Recommended)
Camera Settings
- ISO 100
- Exposure: fixed at 1/60 sec
- White balance neutral
- Autofocus: manual
- Image stabilizer off
Preparation: Start Early
Months Before the Eclipse
1. Compute Eclipse Path: Calculate the position of the eclipse path limit accurately, considering lunar limb adjustments and using a solar radius of 960.00″.
2. Scout Locations: Identify potential observation sites within 500-1500m of the path limit. Avoid areas near artificial lighting or roads with active traffic during totality.
3. Identify the position of the C2 and C3 Baily’s beads relative to the zenith, this is important for diffraction grating orientation.
4. Lens Determination: Determine the correct zoom level by imaging the Sun. Decide if you want to have the sun and the spectrum on the same frame or use a bigger zoom to improve spatial and spectral resolution of the flash spectrum.
5. Equipment Acquisition: Rent or purchase the necessary equipment well in advance.
Weeks Before the Eclipse
1. Download Essential Apps:
– GPS averaging app for precise location recording.
– Talking countdown clock app for accurate timing.
2. Memory and Format Tests: Define and test the video recording format with an appropriate memory card speed.
3. Test Your Setup: Assemble your gear and conduct full tests, including of your star tracker if you have one.
4. Test focusing in daylight.
5. Test assembly and alignment of the star tracker in daylight.
On the day of the Eclipse, before C1
1. Charge All Batteries: Fully charge your camera, star tracker, and any other electronic devices.
2. Clean the Sensor of the camera and adjust black point if available.
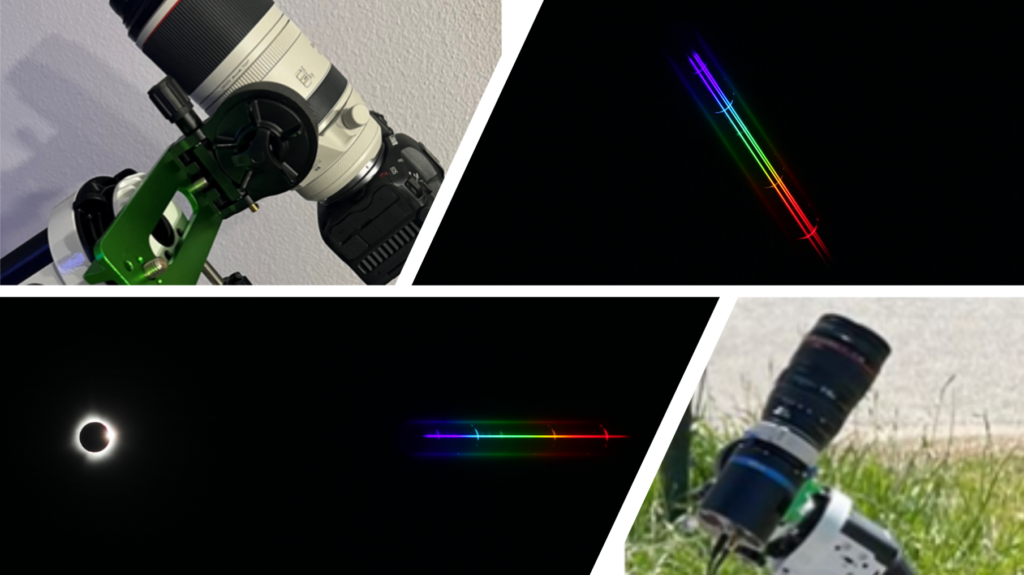
3. Assemble Gear: Set up your star tracker camera, lens, diffraction grating, and solar filter.
4. Set Camera Settings: Configure all internal settings to match your predefined parameters.
5. Record GPS Position: Use your GPS app to record the location by averaging multiple measurements.
During partial phase
1. Orient the Equipment: Point the camera at the Sun and find the spectrum.
2. Diffraction Grating Adjustment: Rotate the diffraction grating so that the flash spectrum is perpendicular to the mid-point of the predicted C2 and C3 contacts (account for the lunar limb topography).
3. Zoom and Focus: Set the zoom level and manually adjust focus until the spectrum is centered within the frame.
4. If using a star tracker, star tracking and set its speed to track the Sun.
90 sec before totality
1. Start Recording: Begin your video recording.
2. Remove Solar Filter: Remove the filter carefully to avoid any jarring movements.
3. Fine-tune Spectrum Position: Ensure the spectrum is centered and perpendicular to the solar crescent.
4.Fine-tune Focus: As chromospheric arcs appear, adjust the focus for optimal clarity.
90 sec after totality
1. Stop Recording: Cease video recording
2. Review Footage: Check the recorded footage to ensure quality and completeness.
Tested Setup Examples
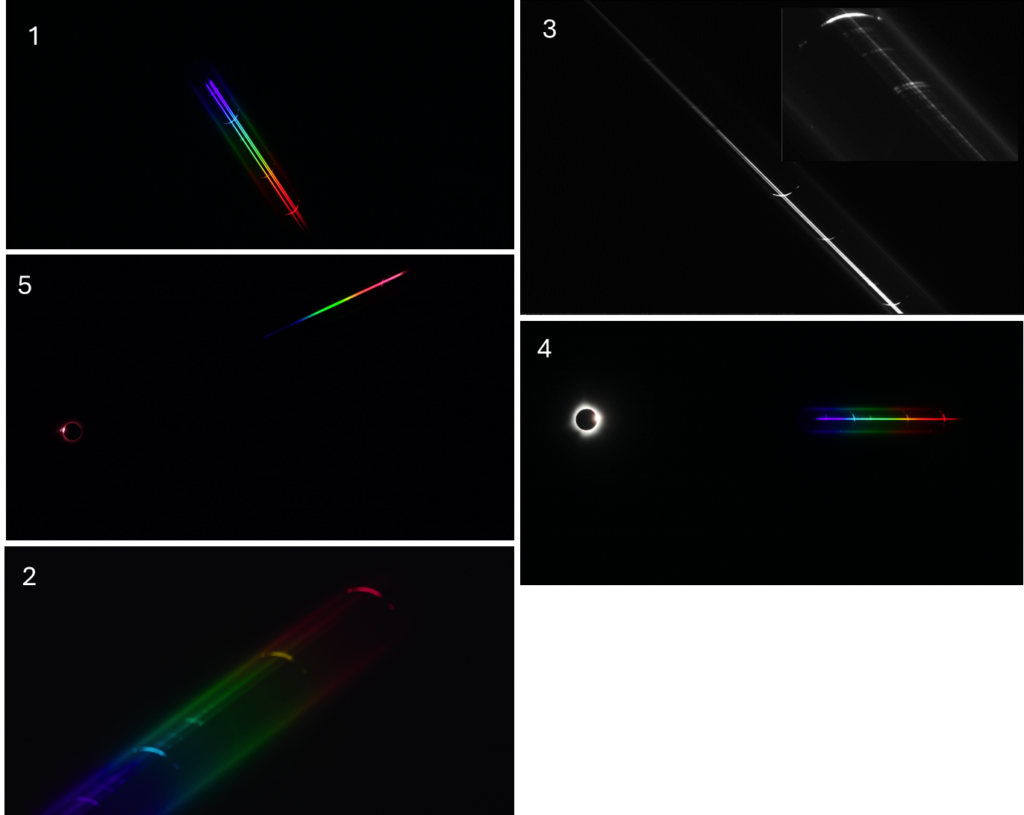
For your reference, the pictures above show un-cropped examples of frames recorded with the following setups:
1. Canon 6D DSLR Camera – 1920 x 1080 video
– Lens: Canon EF 70–200 mm f/4L USM
– Diffraction Grating: 235 lines/mm
(credit: Besselian Elements Team)
2. Canon EOS R5 C Camera – 8192 × 4320 raw video
– Lens: Canon RF 100-500mm f/4.5-7.1L IS USM
– Diffraction Grating: 235 lines/mm
(credit: Besselian Elements Team)
3. QHY174-M Camera – 1920×1200 MONO16 frames @12fps
– Lens: Canon EF 24–105 mm f/4 L IS USM
– Diffraction Grating: 235 lines/mm
– Alternative Diffraction Grating: Star Analyzer 100 or 200
(credit: Besselian Elements Team)
4. Canon 5D Mark IV Camera- 4096 x 2160 video
– Lens: Canon 70-200 f/2.8 stopped down to F4 lens
(credit: Patrick Motl and Dan McGlaun)
5. Canon EOS Ra Camera – 1920 x 1080 video
– Lens: f/4 at 70mm
– diffraction grating: Edmund Scientific with 300 l/mm
(credit: Kerry Lynn)
More:
In order to be used for scientific purposes, the video should be with fixed and good exposure with a signal that doesn’t saturate or goes to zero during the recording end enough resolution and focus to be compared with simulations that shows individual beads light curves.
An additional time reference could be added using a time inserter with GPS accuracy, an early version of which has been described here The GPS Timing Device – Besselian Elements.
Conclusion
Capturing the flash spectrum during a solar eclipse is a rewarding experience that can produce scientific valuable results but demands careful planning and precision. By following these guidelines and thoroughly preparing, you can ensure your efforts will result in stunning, high-quality footage of this celestial phenomenon. Happy recording!